Avalanche Awareness
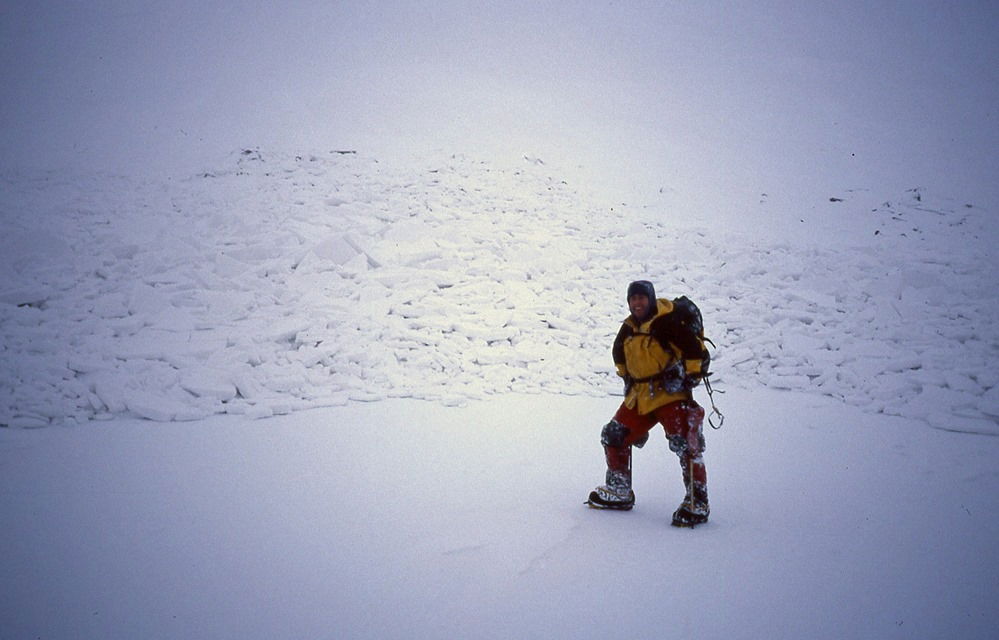
An avalanche on Creag Meagaidh and one of the climbers who triggered it – the other took the photo, hence the camera shake! Although the avalanche danger at the start of the day was low, both climbers involved had been climbing all day (on North Post) in steady snowfall with the wind blowing directly onto the face. Consequently new snow was blown over the top of the crag and deposited to a depth of about 18 inches on the lee slope down which they descended, triggering the avalanche which carried them down to the Window where fortunately it stopped. For the climber in the photo, this was actually his second avalanche on Meagaidh. The first time he had been saved as he and his partner, worried about snow conditions, had wisely elected to keep the rope on on easy ground at the top of the Wand. A party to their left was not so lucky, one being killed by being swept over the crag and the other breaking a leg when he hit a rock, though it did at least save his life. Could the climber and photographer have avoided this avalanche? Yes, they could have descended from Meagaidh in a different direction to avoid lee slopes. (Stephen Reid)
These notes have been prepared for Needle Sports by Wesley Hunter, a qualified mountaineering instructor who runs Adventure Hunter, a Lake District based firm delivering rock climbing and mountaineering courses and other outdoor activities all over the UK. They are intended to assist the climber who has already gained some knowledge of mountaineering and is fully aware of its risks but still wishes to climb mountains. They are brief and not designed to be comprehensive in any way. Ultimately climbing is a dangerous sport and claims many casualties each year. One of the guiding principals of British climbing and mountaineering is that it is the individual climber who is responsible for his or her own safety. If you cannot accept this, then this site and probably climbing in general is unlikely to suit you.
Like everything in nature, avalanches behave and react to physical laws and processes meaning that we can educate ourselves about them and decide upon acceptable and unacceptable levels of risk. What’s more, you don’t need to know about the intricate and infinitely variable structure of individual snow flakes to do so. Being able to observe and read the conditions underfoot will significantly help reduce your chances of getting caught out. The following is intended as an aid to help you make decisions that could be potentially lifesaving.
Deep snow on Green Gully, Ben Nevis. While the steeper parts of the climb are unlikely to avalanche, in these conditions danger lurks on the approach and descent. (Wez Hunter)
Planning your trip: In the weeks and days leading up to your trip gather as much information as you can about the current conditions. Have a look at the Scottish Avalanche Information Service Website and familiarise yourself with the way the information is presented. It’s also useful to have a look at the various blogs that are out there to get a sense of how things are shaping up. Try and come up with a few options in case the conditions aren’t as good as you’re hoping for.
During your trip: It’s extremely important to think carefully about where and when to go. Try not to be too fixed on a particular objective. Keep an open mind and choose something that’s suitable under the prevailing conditions. Good observation skills are essential. Try and pay particular attention to the following:
Wind Speed and Direction: This needs to be considered in relation to the slope aspect you intend to visit. Is the snow being visibly blown around the mountain? If so where is it accumulating? Look out for evidence of wind transported snow. Erosion features such as Sastrugi (little hard raised snow ridges) and raised footprints indicate that snow has been moved from that location, whilst depositional features like cornices and wind-slab show where snow is accumulating on leeward slopes. If for example, the wind has been blowing from the north-west, the snow will be accumulating in the opposite quadrant (south-east). In this instance windward slopes (north-west facing) should be ‘scoured’ by the wind and relatively safe to move around on. The leeward slopes would need to be treated with caution and it’s worth bearing in mind that local topography may affect the wind and therefore accumulations could still be building on other slope aspects (cross-loading). Wind-slab avalanches are the predominant type encountered in the UK. Wind-slab can accumulate over very large areas and can often be identified as slightly off white or chalky in appearance. When walked upon it tends to break away in ‘slabs’ underfoot. Dense wind-slab can also ‘squeak’ when walked on and can be relatively easy to identify. ‘Soft-slab’ on the other hand can be much harder to identify but equally dangerous given the right conditions.
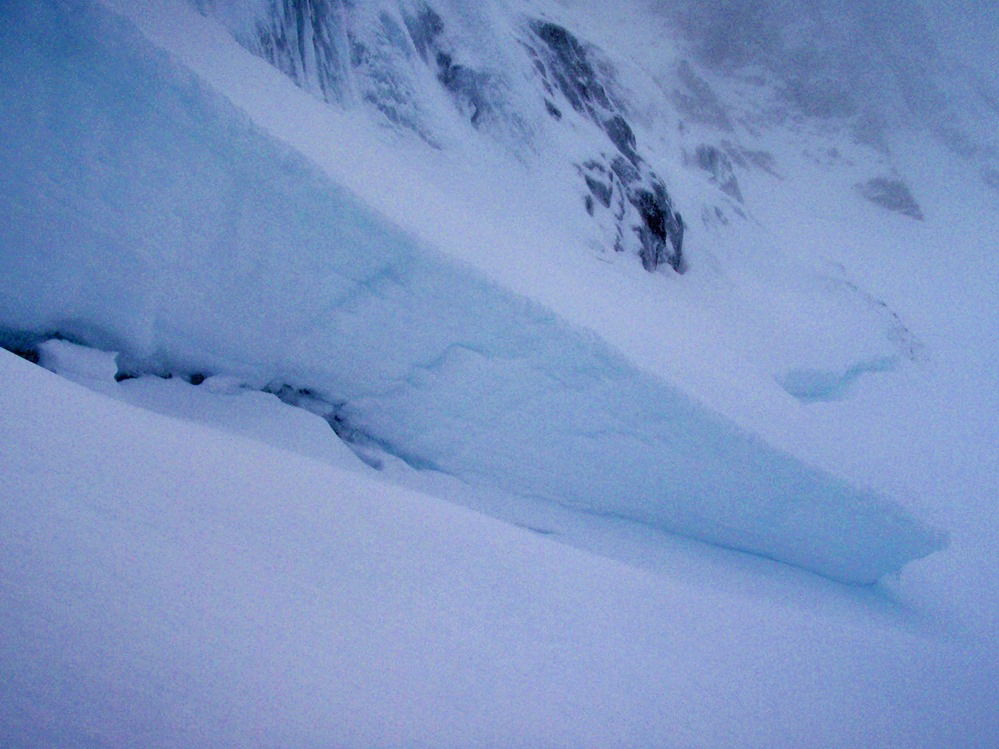
Photo above: A crown wall (avalanche break off point) from a wind-slab avalanche below Green Gully on Ben Nevis. It is sometimes possible to approach climbs safely once the slopes have ‘purged’ themselves. However, it is worth remembering that some areas may be in the path of multiple avalanches. (Wez Hunter)
Terrain: The prime angle for avalanches is between 30° and 45° (although they can and do occur on slopes outside of this range). Unfortunately, this is also a great angle for skiing and will typically be encountered on the approach to many winter climbs. The shape of the ground is also important. When snow falls onto the ground it bonds with the surrounding snow. These bonds can be strong or weak depending upon lots of factors, and this creates internal tension in the snowpack. The shape of the ground underneath can increase or decrease these areas of tension. Convexities in particular can increase tension in a snowpack and can become potential trigger points. The type of ground underneath can also make some areas more prone to avalanches. If there are smooth slabs of rock underneath it may provide a good sliding surface, whereas a boulder field will create more friction and help ‘anchor’ the snow to the ground. However, it’s important to remember that if the snow is very deep, weak layers may be present in the snowpack above this. It’s also important to consider terrain hazards. Many accidents have occurred as a result of relatively small avalanches which have still been sufficient to carry people over cliffs or into gullies.
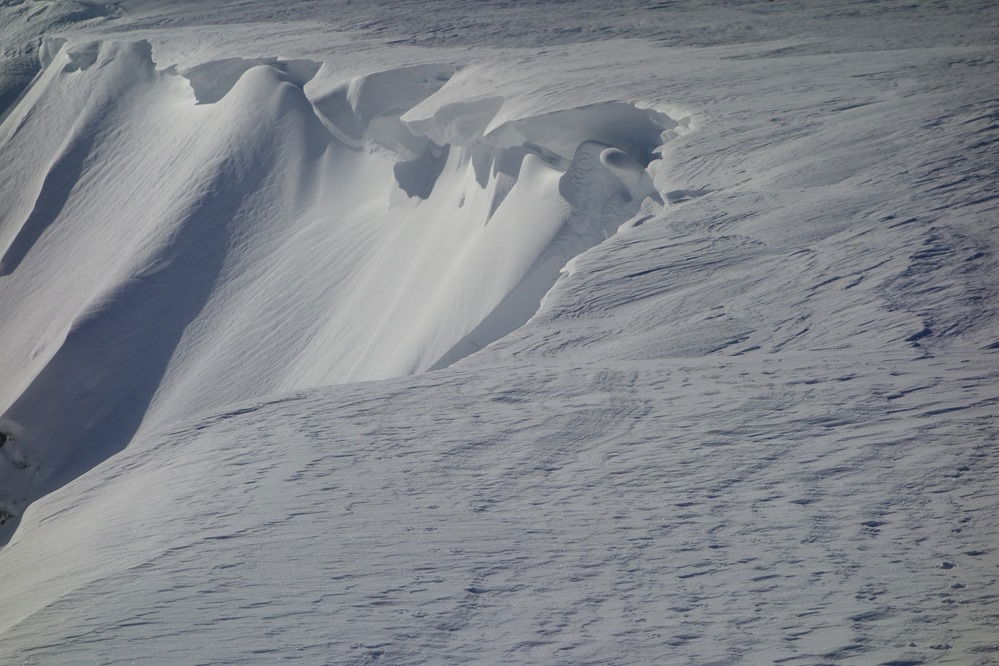
Hidden danger – cornices can be hard to see from below. They will form at the top of lee slopes and can collapse in a thaw, if someone walks on top of them, or simply under their own weight. All the debris will funnel down the gully below – with devastating effect. (Wez Hunter)
Temperature: Both cold and warm temperatures have their good and bad points. If there is a weak layer in a snowpack, cold (sub-zero) temperatures can help preserve weakness for a long time. A gentle thaw and re-freezing can go a long way to stabilise the snow and if this pattern continues it can lead to the formation of nevé which can give fantastic winter climbing conditions. Warmer temperatures can also bring an increased risk of cornices collapsing. Whilst gentle warming can help stabilise the snow, there is a tipping point that once crossed will loosen the bonds within the snow and lead to increased risk of avalanches.
Snow pits: Take a little time during your day to look more closely at the snow. This is a good way to help identify any particularly weak layers such as depth hoar or buried surface hoar (a type of crystal growth that can develop in and on top of a snowpack, and can create particularly weak layers). It’s important however to understand that there is so much spatial variability within the snow, that snow pits shouldn’t be used as a ‘diagnostic tool’ on their own. What’s happening in the snow just a few metres away may be entirely different! But, used in conjunction with local weather and avalanche reports, as well as other observations made during your day, they can help build up an overall picture of snow conditions. Snow pits can be dug with your hands or adze, or better still, if you are carrying a snow shovel, use it to create a clean face by slicing/digging down vertically until you reach the ground, or a known stable layer if the snow is very deep. Look out for any layers that look or feel significantly different to the surrounding snow. Do they look sugary or like little white ball-bearings (possible buried graupal)? How well does the snow bind together to form a snowball? These are all indicators of snow stability and signs of potential weak layers. How deep down are they? A variety of more methodical stability tests can also be used which take relatively little time, such as the ‘Burp test’, ‘Compression Test’ or ‘Rutschblock’. If any of these tests reveal a weak layer then the snow above that layer can slab avalanche very easily. Likewise, if you dig down and discover a hard icy layer, that too can be a potential fracture point for a slab avalanche as the upper snow will not be bonded to the hard layer. Such a hard layer can be a long way down.
Finally, remember: Don’t assume that just because someone else has been somewhere or done something that it’s safe to follow. Try and adopt a careful and considered approach and make your decisions based on this. Seeking short cuts in our decision making is a trait of being human and to a large extent this enables us to carry out numerous complex tasks at the same time. However, when the consequences are high you have to be conscious not to cut corners. It’s beyond the scope of this to go into great detail, but ‘Heuristics’ or ‘Heuristic traps’ are accountable for many avalanche fatalities and accidents even amongst the most experienced. Unfortunately, none of us are immune from it, but it is important to acknowledge its effect.
Wez Hunter
©2017
Avalanches are not always where you might expect them. This one was triggered by thawing conditions in the northern fells of the Lake District. (Wez Hunter)