Big Wall Aid Climbing
These notes are intended to assist the climber who has already gained considerable knowledge of Multi Pitch rock climbing and general alpine mountaineering and is fully aware of its risks but still wishes to progress into Big Wall climbing. They are brief and not designed to be comprehensive in any way.
Ultimately climbing is a dangerous sport and claims many casualties each year. One of the guiding principals of British climbing and mountaineering is that it is the individual climber is responsible for his or her own safety. If you cannot accept this then this site and probably climbing in general is unlikely to suit you. May we refer you to this very interesting site instead!
Jeff Macdonald Jumaring up to Big Sandy Ledge , Regular Northwest Face of Half Dome 5.9 C2. Photo: Matt de Vaal.
From the outside, big wall climbing looks like extremely hard physical work with complex rope work that is beyond most traditional climber's reach - this is however not true! Although it is a type of climbing most suited for the more experienced and hardened multipitch rock climber, that doesn't mean you can't learn the techniques required with a little effort.
Routes like ‘The Nose' on El Captain, Yosemite can be climbed easily by a solid E1 climber if they have gained the required skills and techniques to tackle such a gigantic cliff. Being mountain fit will help too. With a little practice and lots of motivation, big wall climbing is a very rewarding adventure that will never be forgotten and will no doubt lure you back for more.
Dealing with cluttered belays, aid climbing, jumaring ropes, hauling, water and food rations, weather and logistics can be daunting but the best way to cope with all of these things is to keep it simple, plan ahead, practice techniques and have plans in place for when things don't quite go to how you want them to.
Photo right: Jeff Macdonald starting up Pitch 8 Skull Queen, Washington 5.8-C2+. Photo Matt de Vaal.
Photo: Matt de Vaal.
Most climbers who think about climbing a big wall for the first time, aspire to climb a route on the iconic cliff of El Captain in Yosemite, California, USA, especially via The Nose. These notes will be very loosely based around climbing a big wall in Yosemite that most new to big walling will cut their teeth on, but not The Nose. It's worth noting that The Nose has around 700 teams trying to climb it each year and a lot of these teams try it as their first big wall. And only around 40% of those teams succeed! Most of the unsuccessful teams are under prepared, not correctly equipped or terrified with what looms above. Mental strength (or lack of it) is a huge factor in failure rates. Get a shorter wall or two under your belt first and work up to your end goal - an E2 climber wouldn't attempt an E7 climb without climbing through the grades first (at least they shouldn't)!
Living in the UK, It can be difficult to practice the required techniques you will need to become a successful Big Wall climber but it is by no means impossible.
The following books have invaluable information and are a great starting point.
|
How to Big Wall Climb by Chris McNamara is modern, up to date, simple and reasonable user friendly (though it has a few typo mistakes). Added You Tube clips you can watch when confused by the text are a bonus. |

|
Big Wall Climbing - Elite Technique by Jared Ogden is a comprehensive book that covers all aspects of big wall climbing, including speed climbing and solo climbing techniques. |
|
Hooking Up by Fabio Elli and Peter Zabrog is a recently published guide to everything you ever wanted to know about big wall and aid climbing (plus a lot you didn't!) |
|
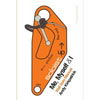
Me, Myself & I is an in-depth study of the dark art of big wall roped soloing by Andy Kirkpatrick. Andy Kirkpatrick's Website is also a good source of reference. |
Setting up the sleep system with plenty of daylight can be a real bonus and brilliant for moral.
Big Sandy Ledge, Regular Northwest Face of Half Dome 5.9 C2. Photo: Matt de Vaal.
There are two types of Aid Grading Systems that you should know about :
Clean Aid: (without the use of a hammer) ranges from C1 (straight forward) to C4 (the limit of what is possible before you need to start hammering). The climber will use their normal rack, cams, wires and maybe the odd skyhook to make upward progress. Sometimes other equipment like pitons, cam hooks and peckers can be used but without the use of a hammer to seat them.
Hammered Aid: is graded from A1 to A5. In addition, A0 is considered to be a fixed bolt or piton that is permanently in place and won't require a hammer. Confusingly it is also used to designate a move that requires pulling on gear whilst free climbing without the need of aiders unless you are climbing a series of bolts close together (a bolt ladder).
Most climbers' first big wall is likely to be one graded with a lower “C” grade, with a lot less to learn, and cheaper (due to the fact you won't have to buy pitons, copper heads, a hammer etc). Plus these climbs tend to be easier and therefore a good place to start.
Techniques a newcomer to big wall climbing will need to learn and practice:
- Ascending a rope with the use of ascenders (also known as Jumars) and etriers.
- Setting up hauling systems and hauling your bag(s) full of your equipment, water and food.
- Pendulum traverses both leading and following.
- Setting up a portaledge and taking it down (if a portaledge is required).
- Reading and understanding topo style route maps.
Looking down the amazing Stove Leg Pitches of the Nose, 5.8 C2 El Capitan. Photo Matt de Vaal.
Efficiency is key to big wall success and all of the above techniques should be practiced over and over again on different angles of rock and both during the day and at night by torchlight.
As well as being efficient, good logistics are also a key to success. The amount of water and food you carry, where you're planning to sleep, other parties on the wall and of course weather will be major factors to consider.
Finally, be weight conscious! The weight of the rack, water, food and other equipment can determine how long you will spend on a wall. Try to be as light as you possibly can.
Preparing for a Big Wall takes considerable gear organisation, and taking just the right amount of gear and not too much is a skill. Photo Matt de Vaal..
Equipment and a Big Wall Rack
The list below is based on the author's recent big wall trip to Yosemite where he climbed both Lurking Fear (C2 5.7) and Triple Direct (C2 5.7), both on El Captain.
This list has lots of optional items that he has identified as worth having following experience of other big wall routes in Yosemite and Europe over the last 10 years but is not in any way a definitive list of required items. In fact not all the items listed were required, nor taken on both routes mentioned, but they are worth considering.
Although the list above is quite extensive and fairly expensive to buy all at once, many items don't have to be top of the range.
Some kit like gloves, poop tubes and even haul bags and portaledges have been known to be homemade.
And, if you aren't sure whether big wall climbing is for you, it would be sensible to borrow as much as you can for your first attempt.
A fixed Alloy Head that can’t be trusted but that you may have to rely on for upward progress
- thankfully not typically found on easier trade routes around Yosemite.
Photo: Matt de Vaal.
Top Tips
To make the whole experience a lot nicer and even safer the following come highly recommended and in some cases very important.
- Wear comfortable approach shoes like the 5.10 Guide Tennies.
- Use a comfortable Harness, something with an extra wide waistband.
- Carry Offset Micro Cams and Offset Wires to deal with old peg placements.
- Use the same types of Cams and Micro Cams. This will make your life a whole lot easier as these will be your main protection for both free and aid climbing. You'll place them hundreds of times!
- Carry multiple copies of your route topo, one for each member and a spare.
- Carry a Water Bottle on your harness. When you finish a pitch that has taken two hours, you'll be upset that your partner has the daypack with the water in it!
- Climb On is great to help heal sore swollen hands.
Matt de Vaal Pitch 6 of Skull Queen, 5.9 C2 Washington Column. Note: Hoody Sun Top! A key bit of clothing for spending all day in the California Sun. Photo: Jeff Macdonald.
To give you some idea of the exposure on a big wall route, here is a panoramic view from the end of the Great Roof Pitch two thirds of the way up The Nose, El Capitan, Yosemite taken by Matt de Vaal.
Jeff Macdonald heading up P3 (on a Dolt Run) of the Nose 5.8 C2 on a very wet El Capitan after a winter storm.
Watch out for falling ice after a winter storm! Photo: Matt de Vaal.
If you have any questions about Big Wall Aid Climbing and its gear please contact Matt de Vaal at Needle Sports.